Home › Forums › Orthodontics › Microimplant screws for Anchorage in Orthodontics
Welcome Dear Guest
To create a new topic please register on the forums. For help contact : discussdentistry@hotmail.com
- This topic has 5 replies, 4 voices, and was last updated 22/06/2012 at 2:51 pm by
Anonymous.
-
AuthorPosts
-
04/05/2012 at 6:33 pm #10482
Anonymous
OnlineTopics: 0Replies: 1151Has thanked: 0 timesBeen thanked: 2 timesThis material has been provided by courtesy of http://www.healthmantra.com/
ic/index.shtml Advantages of Microimplants
Use of these devices leads to:
- 24 X 7 Force delivery
- simplified mechanics,
- improved results,
- drastic reduction (upto 40%) in treatment timing,
- reduction in number of extractions
- Minimal dependence on patient co operation
Disadvantages of Microimplants
- High Cost of the devices
- Failure of about 10% fixures
- Problem in site selection in patients with poor Bone quality
- Patient acceptance may be an issue in some cultures
Common Indications for placement of Temporary Anchorage devices/mini implants
Every case is not suited for microimplants. Minimal anchorage cases now can be treated non extraction with MI, many other average extraction cases we found that treatment objectives are achieved and extraction space is still remaining. Hence the cases where you need molars to come forward to occupy some of the ext space, are better done without MI or done with caution.- Mini implants are used most beneficially where three dimensional stable anchorage is needed, some of these situations are:
- Where you can not afford any movement of reactive units (maximum anchorage case)
- Patient with several missing teeth making it difficult to engage posterior units
- For difficult tooth movements, eg intrusion of anterior and posterior segments and ditalisation
- Where asymmetrical tooth movement is needed
- To treat borderline cases with non extraction method
- Doing extreme ortho when patient is not willing to undergo orthognathic surgery
Common SITES OF PLACEMENT-see pic below
MAXILLA:- Infrazygomatic crest area.
- Tuberosity area.
- Between 1st and 2nd molars buccally.
- Between 1st molar and 2nd premolar buccally.
- Between canine and premolar buccally.
- Between incisors facially.
- Mid palatal Area.
MANDIBLE:
- Retromolar Area.
- Between 1st and 2nd molars buccally.
- Between 1st molar and 2nd premolar buccally.
- Between canine and premolar buccally.
 04/05/2012 at 6:33 pm #15441
Anonymous
Types of Devices
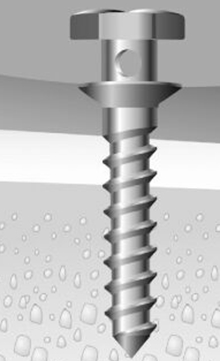
MINISCREWS: Of all orthodontic implants, miniscrews have gained considerable importance due to less surgical procedure and easy installation. Titanium miniscrews may be an ideal anchorage system that fulfills the clinical needs of the orthodontist. Some of their benefits include dependability, are well accepted by patients, can be immediately loaded, and are simple to insert and remove, and conform to the anchorage needs of the orthodontist/ The miniscrew can be loaded immediately with forces in the range of 50 to 300. This anchorage system can be used to support a variety of orthodontic tooth movements in clinical situations involving mutilated dentitions, poor cooperation, or extraction cases requiring maximum anchorage. Common sizes of mini implants often used are 1.2 – 2 mm in diameter and 6-10 mm in length in various combinations.
MINIPLATES:
The Miniplate Implants are comprised of bone plates and fixation screws. The plates and screws are made of commercially pure titanium that is biocompatible and suitable for osseointegration.
The miniplate consists of the three components—the head, the arm, and the body The head component is exposed intraorally and positioned outside of the dentition so that it does not interfere with tooth movement. The head component has three continuous hooks for attachment of orthodontic forces. There are two different types of head components based on the direction of the hooks.
The arm component is transmucosal and is available in three different lengths—short (10.5 mm), medium (13.5 mm), and long (16.5 mm) to accommodate individual morphological differences. The body component can be positioned subperiosteally and is available in three different configurations—the T -plate, the Y-plate, and the ¬L- plate.
Main advantage of miniplates is that they do not interfere with tooth movement as they can be placed away from tooth. Multiple screws used to fix the miniplate provide a robust anchorage unit. Useful where you need consistent and reliable delivery for prolonged periods.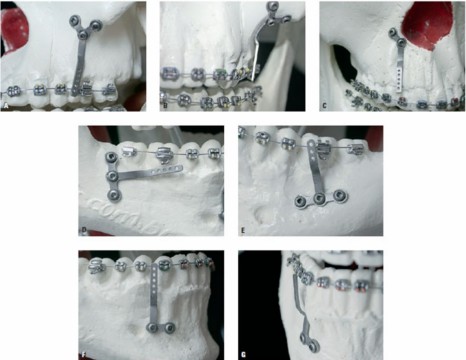
Palaltal Implants-Onplants
The use of onplants for orthodontic or orthopedic anchorage is a relatively new area of research, and investigations on this subject are limited. In 1995, Block and Hoffman1 reported on the successful use of an onplant, a subperiosteal disk, as orthodontic anchor- age in an experimental study with dogs and monkeys. It was a relatively ?at, disk-shaped ?xture of 7.7 mm (Nobel Biocare, Gotenberg, Sweden) with a textured, hydroxyapatite-coated surface for integration with bone. Unlike implants, onplants require only simple surgical procedures to place and to remove; this makes them more versatile than implants as anchorage units in orthodontics. Onplants are osseointegrated on relatively inactive bony surfaces. They can be placed in patients with various stages of dental eruption. Onplants are surgically placed on the ?at part of the palatal bone near the maxillary molar region. An incision is made in the palatal mucosa from the premolar area toward the midline. The tissue is tunneled under, in full-thickness fashion, past the midline to the eventual implantation site. The onplant is then slipped under the soft tissue and brought into position, and the incison is sutured. A vacuum-formed stent is worn by the patient for 10 days for the initial stabilization.TPA is attached to onplant after healing. Surgical procedure is quite invasive with Onplant.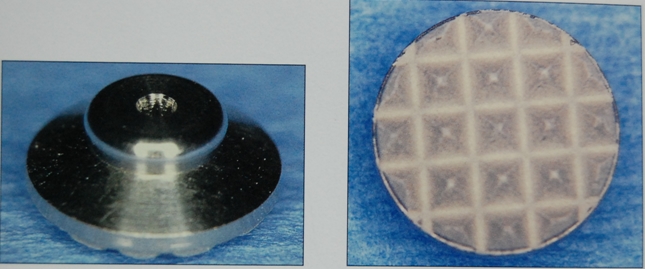
Bicortical Screws
The placement of microimplant may be bicortical or unicortical. A unicortical placement means the miniscrew is dependent on only one cortical plate, as opposed to an anchor that is longer and contacts both cortical plates, such as in the area of the lower anteriors. An anchor of sufficient length can pass through the facial cortical plate and contact the lingual cortical plate—this is, a bicortical situation. Bicortical screws give you better stability and anchorage value.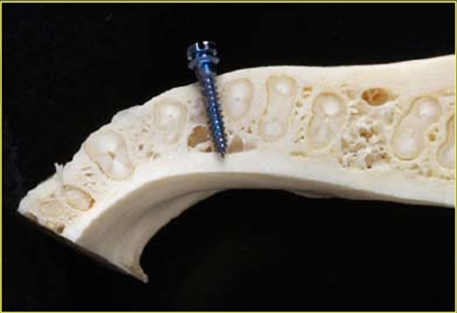
Transalveolar Bicortical Screws
New trans-alveolar screw (TAS) as a temporary orthodontic anchorage device for the posterior maxilla to intrude an overerupted maxillary molar. The main advantage of TAS is that when placed in the maxilla to intrude upper molars, they allow application of intrusive force from both buccal and palatal aspects simultaneously, so the line of force in relation to the center of resistance of the posterior segment, allows an in-mass intrusion, avoiding buccal tipping or rotations. Moreover the surgical procedure for inserting and re- moving the bicortical screw is simple, does not require any surgical flap, so complications are minimal and screws can be loaded immediately, without requir- ing any waiting healing period of time.
To place the TAS, local anesthetic is infltrated both in the vestibular and palatal sides. A 1.8-mm bur drills transmucosally at the mucogingi- val junction. It crosses the alveolar process and exits through the palatal mucosa 04/05/2012 at 6:35 pm #15442
 drsushant
OfflineRegistered On: 14/05/2011Topics: 253Replies: 277Has thanked: 0 timesBeen thanked: 0 times
drsushant
OfflineRegistered On: 14/05/2011Topics: 253Replies: 277Has thanked: 0 timesBeen thanked: 0 timesMethods of placement
- Pre-tapping method: In this method the miniscrews is driven into the tunnel of bone formed by drilling, making it tap during implant driving). This method is used when we use small diameter miniscrews
- Self tapping: Here a slight notch is made and then the screw is tapped in bone.
- Self-Drilling method: Here the miniscrews is driven directly into bone without drilling.
Selection of microimplants
a. Length Considerations
The length of screw portion is ranging from 6mm to 12 mm. Longer microimplants lead to better mechanical stability like dental prosthetic implants, but more possibilities of invading adjacent anatomical structures, such as roots, maxillary sinus and nerve etc. Always we should consider the depth of soft tissue when choosing proper length of microimplantsd. Especially palatal mucosa may be very thick in many. So, if soft tissue is 6mm thick, in order to place 6mm of screw portion into the bone, at least 12mm length of microimplant should be chosen. This protocol requires that the soft tissue thickness as well as the bone quality must be evaluated at the location of placement.
Also, in choosing the proper length of a microimplant, the path of insertion of the microimplant must be considered. A microimplant can be placed either in a diagonal direction or a perpendicular direction relative to the cortical bone surface. It is better and easier to place microimplant in a perpendicular direction, but, there are many situations in which the microimplant should be placed in a diagonal direction so as to avoid injury to an adjacent tooth root. When the microimplant is placed in a diagonal direction rather than perpendicular direction, it is better to use a slightly longer microimplant (Fig).
b. Diameter Considerations
There are various diameters, ranging from 1.2 mm to 2 mm, so they can be placed anywhere in the mouth. Depending on the inter-radicular distance, quality of bone and site of placement, we can choose different diameters of microimplants.
Thicker the microimplant, the greater becomes mechanical retention, but also the greater possibility for root contact. Thicker microimplants do not always guarantee higher success rate, even there is a report that microimplant of smaller diameter showed higher success rate than thicker ones (Kuroda et al,2007). Also thicker microimplants may be hard to remove due to osseointegration, in genral always choose smallest diameter as practical. When we place the microimplants between root, if we choose bigger ones, we can have more chance to touch the roots. If microimplant is touched to the root, the failure rate will be increased significantly (Kuroda et al, 2007).These are the commonly used length and diameter in most routine situations:-
a. buccal & labial areas of maxilla : Cortical bone in these areas is not that thick, so use 1.2-1.3mm thick. Microimplants made by titanium alloys of this thickness can be inserted safely without pre-drilling on maxillary buccal areas.
b. palatal areas of maxilla : Soft tissue is thick, so usually microimplants of longer than 10mm is needed, but the longer, the higher possibility of breakage, so use a little thicker ones ( 1.5-1.6 mm ) than buccal areas. The distance between roots is greater in palatal areas than buccal area, there is lower possibility of root contact even when using thicker microimplants.
c. midpalatal suture : There is no worries for root contact, and also this is sutured area, so thicker ones are used. Microimplants of diameter larger than 1.7mm is recommended. Even 2 mm thick one can be used for younger cases.
d. buccal & labial areas of mandible : Cortical bone of mandible is harder than maxilla, so, a little thicker ones (1.5-1.6mm) are better to prevent breakage especially for self-drilling (drill-free) method.
04/05/2012 at 6:36 pm #15443 drsushant
OfflineRegistered On: 14/05/2011Topics: 253Replies: 277Has thanked: 0 timesBeen thanked: 0 times
drsushant
OfflineRegistered On: 14/05/2011Topics: 253Replies: 277Has thanked: 0 timesBeen thanked: 0 timesFailures can be mainly immediate or delayed. Further they can be classified into 3 categories
- Host/patient related
- Operator related
- Implant related
Patient Factors
- Systemic disorder in patient
- Smoking habit/ mouth breathing
- Poor quality of bone
- Excessive thickness of mucosa
- Quality of gingival/ perio tissue
- Poor oral hygiene maintenance
- Medications like anti epilepsy
- Radiotherapy
- Diabetes, Osteoporosis
- Site related, more failure in mandible
Operator related
- Faulty surgical procedure
- Self drilling technique is better
- Proper angulation of Implant
- Excessive heat generation
- Large hole during drill use
- Aseptic technique
- Damage to root or nerve tissue
Implant related
- Proper choice of implant length and diameter
- Smaller than 8 mm fail more
- Distortion during placement
- Placement in keratinized gingiva is better when possible
- Use miniplates when anchorage requirement is heavy
- Titanium screws are better, you can easily bond composite on them
- Excessive force application
Risks related to use of Mini/micro implants
Use of microimplants is very easy and hardly has any risks. For discussion- Different types of risks and their solutions are given belowInadequate primary Stability
- Overdrilled hole
- Bone less than 0.5-0.75 mm around the screw
- Excessive trauma
Delayed mobility
- Implant overloading
- Such screw should be removed and replaced
Temporary Periimplantitis
- Symptomatic treatment
- Oral hygiene instructions
Screw fracture during removal
- If you take it out straight fractire is rare, lateral forces cause #
- If microimplant is left for very long time, this also could be as a result of partial or full osseointegration
Damage to roots
In an animal-experimental study, 20 mini-screws were inserted into the mandible of five beagle dogs. apical X-rays were taken every 6 weeks. Radiographic examination demonstrated damage at three roots because of insertion of the screws.
Histological examination at these three roots demonstrated an almost complete repair of the periodontal structure (e.g. cementum, periodontal ligament and bone) in a period of 12 weeks, following removal of the screws. Clin Oral Implants Res 2005 Oct;16(5):575-8, Root repair after injury from mini-screwSome other problems could be:
- Tooth Root impingement- periodontal space or cementum- Follow proper method
- The mucosa would turn with the drill when attempting to drill the pilot hole (solutioin- place incision and drill )
- Oro-antral communication- normally it is 2mm or less it is of no consequence
- Soft tissue irritation –buccally or on gingiva (ligature)-• Use guides to avoid gigival impingement
- Soft tissue coverage of Mi and auxillary, take special care of angulation and type of head of Mi specially near loose mucosa areas
- Nerve impingement -To avoid nerve injury and slippage, do not use screws longer than 8 mm in retromolar area
- Air Subcutaneous emphysema- use of air rotor or air syringe near loose mi mucosa can lead to this condition
- Screw slippage into mucosal spaces-This should be carefully avoided by following proper technique
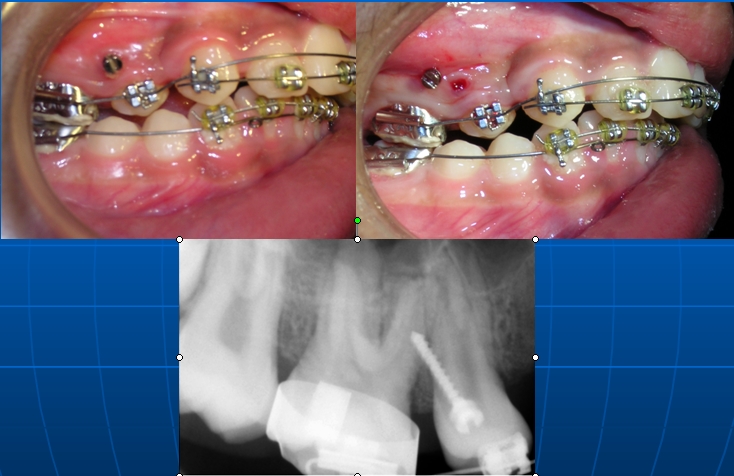
See the radiograph, here 2 retro molar pad screws slipped and entered posterior submandibular space. Buccal flap was raised to remove them by oral surgeon. Patient reported mild paresthesia at commissure of lower lip.

Failure examples
Typical Failure how it looks like

See below how the ulceration was caused and it healed after covering screw head with composite, lower image shows ulceration in lower arch, failure as well as ulceration is more in mandible in this area compared to maxillary arch.


Here you can see a case where screw went into perio space and caused mesial movement of premolar, it was removed and replaced in the same visit. Radiograph did not show any anomany and treatment continued unhindered.
 22/06/2012 at 2:46 pm #15639
DrAnil
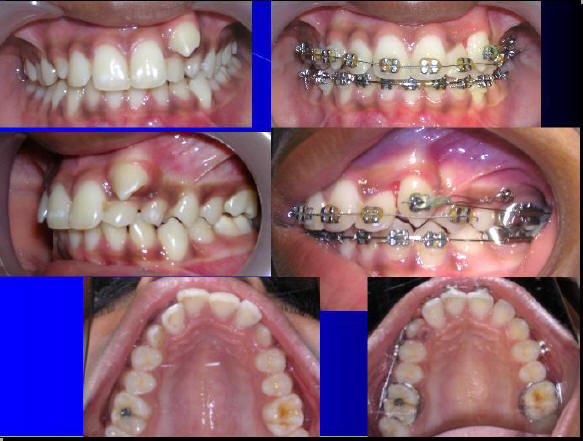
OfflineRegistered On: 12/11/2011Topics: 147Replies: 101Has thanked: 0 timesBeen thanked: 0 timesCase 1 shows intrusion. Case 2 shows cuspid retraction in 3 months, no load on molar, no need for cl II elastic, no need for patient cooperation.
Here in A you can note that teeth number 12 and 13 have 100 percent Overbite. Can of occlusal plane from frontal view is tilted. Titanium screw was used in this case. It was covered by mucosa soon after placement( B). You can see the progress and it was debonded after 3 months, . Screw was easily removed as you can see in the pics below.
This pure Titanium screw is made in India and costs only about Rs. 300 each.
CASE 1


CASE 2
 22/06/2012 at 2:51 pm #15640
Anonymous
How to place an implant screw for anchorage
First mark the area of placement of screw using an explorer.
1. Give a few drops local anesthetic in the area of placement
2. Sterilize the screw cold/hot and keep is ready engaged in the screwdriver
provided, place the screw in the slot and rotate the collar on screwdriver
anticlockwise to engage it properly.
3. now ready the airrotar handpiece with a sharp ended diamond bur
4. Now in the marked interproximal position drill for about 2-3 mm (this would take
just touch and go) this takes just 3-4 seconds. CAUTION: Overdrilling is
normally a major cause of failure. take care that you are in proximal area only and not going in the periodontal space of
molar or premolar- stay in interproximal.
5. Now when the hole is ready you will see a pin size bood mark
6. now insert the screw and with a gentle push screw it down, do not go all the way
down, it will become difficult to withdraw the screwdriver ( which is done by
clockwise rotating the collar on the screwdriver) by sliding it out.
7. Final few turns should be given using a separate small screw driver or a sharp
instrument in the clinic. Now screw can be loaded immediately, use elastic chain or niti coils, what ever you like.
This process does not require that you should prescribe any analgesic.
After treatment is over you can remove the screw but unscrewing it.
-
AuthorPosts
- You must be logged in to reply to this topic.
