Home › Forums › Prosthetic dentistry › Removable prosthodontics › Stabilizing Partial Dentures Using Small-Diameter Implants
Welcome Dear Guest
To create a new topic please register on the forums. For help contact : discussdentistry@hotmail.com
- This topic has 2 replies, 2 voices, and was last updated 24/09/2012 at 5:57 pm by
Drsumitra.
-
AuthorPosts
-
24/09/2012 at 5:49 pm #10929
 drmithila
OfflineRegistered On: 14/05/2011Topics: 242Replies: 579Has thanked: 0 timesBeen thanked: 0 times
drmithila
OfflineRegistered On: 14/05/2011Topics: 242Replies: 579Has thanked: 0 timesBeen thanked: 0 timesThe innovative use of dental implants is opening doors to many different types of treatments. However, at the same time, criticism is surfacing that the sometimes prohibitive cost of a traditional implant procedure, the stringent candidacy requirements, and general dentists’ apparent reluctance to offer the procedure are combining to inhibit the potential of this treatment. Dr. Gordon Christensen recently highlighted the challenges presented by traditional implant protocols, pointing out that bone grafting, which is often suggested to enable patients with inadequate bone to receive implants, adds additional time and expense to the treatment. The cost of the implant procedure alone may be perceived as high for many patients, and the need for bone grafting may exceed the patient’s budget for this treatment modality.
An appealing solution for many of these issues can be found in the increased use of small-diameter implants (also referred to as mini-implants), which are gaining favor among patients and dental implant practitioners. As a long-time proponent of small-diameter implants, I have seen firsthand how this treatment protocol can be used to overcome patients’ financial and anatomical limitations, providing them with a timely and functional solution that can make an immediate difference in their lives.
While small-diameter implants are most frequently used in lower denture stabilization procedures, there are additional applications for these implants beyond that popular technique. As an instructor on the small-diameter implant technique, I present a series of courses on the types of treatments that can be achieved with small-diameter implant certification. While the basic technique for mandibular denture stabilization can be taught in a one- or 2-day seminar, further opportunities are available to dentists who would like to more fully develop their small-diameter implant capabilities. This article will demonstrate one of those techniques—use of small-diameter implants to stabilize partial dentures.BACKGROUND: IMPLANT STABLIZATION OF PARTIAL DENTURES
Partial dentures, much like full dentures, can often shift and rock as the patient masticates, speaks, coughs, sneezes, etc, which can be a nuisance in the best conditions, and an embarrassing handicap in others. To overcome these problems, small-diameter implants can be utilized with partial dentures in both the maxilla and mandible. The use of small-diameter implants to retain partial dentures helps reduce movement of the partial denture, thereby increasing the overall function of the prosthesis, as well as the patient’s security and social confidence. The advantages to using small-diameter implants in conjunction with partial dentures are very similar to the benefits of the treatment for patients wearing full dentures. The technique for placing the small-diameter implants is less invasive, less costly, and can be completed in a shorter amount of time when compared to the protocol for regular diameter implants. Furthermore, the candidacy requirements for patients are not as stringent for small-diameter implants as they are for traditional implants, making them a more viable option for the edentulous and partially edentulous population.
The diameter of small-diameter implants ranges from 1.8 to 2.9 mm, and the placement and denture adaptation procedure can be performed in about one hour. An important distinction of small-diameter implants is their ability to be immediately loaded in the mandible, making them a convenient option for patients who are seeking an immediate solution for denture stabilization. Finally, small-diameter implants are a practical service that can be offered in a general dental practice setting. With proper training, the technique can be incorporated with a minimal investment in equipment and materials, and this service appeals to a large patient population.CASE EXAMPLES
Small-Diameter Implants for Upper Partial Dentures
The patient, an elderly man, had an existing partial upper denture that used clasps to help secure it to teeth Nos. 6 and 12. The patient was not fully satisfied with the aesthetics, function, or retention of the partial denture. Therefore, we discussed the option of creating a new partial denture that would be stabilized with small-diameter implants instead of traditional partial denture clasps. The patient agreed to explore this treatment plan, and we proceeded with a diagnostic workup. Unlike the diagnostic procedure for lower denture stabilization, a lateral film is not usually necessary for placement of small-diameter implants in the upper arch. The diagnostic workup is completed with a panoramic radiograph and bone sounding to determine the bone width, or a computed tomography scan can be utilized (Figure 1). Anatomical considerations during the diagnostic steps include location of the maxillary sinuses and nasal sinuses.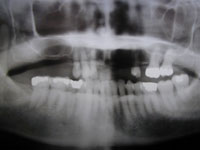
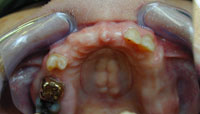
Figure 1. A panoramic radiograph was taken to locate maxillary sinuses and nasal sinuses. Figure 2. Due to periodontal involvement, the upper right first bicuspid was extracted. A tooth was then added to the patient’s existing partial denture. The patient in this case was considered a good candidate for the procedure due to the quality and quantity of bone, and he consented to proceed with the small-diameter implant treatment plan. Due to periodontal involvement, the upper right first bicuspid was extracted and a tooth was added to the patient’s existing partial denture. The site was allowed to heal for 4 months before the small-diameter implants were placed (Figure 2).
Following the healing period, rests and guide planes were prepared. Then, a polyether impression was taken for construction of the new partial denture. A dental laboratory prescription was prepared requesting a closed oval major connector, with no mesh in areas where the small-diameter implants were to be placed. While it is possible in some maxillary partial denture cases to adapt an existing denture for use with implants (as is often done in the mandible), fabricating a new custom metal framework allows for better small-diameter implant location and provides additional room for the female metal housing pickup without damaging the framework.
Using the bone topography measurements obtained in the diagnostic workup, the precise locations for each of the 4 implants were determined. Classic MDI Implants with a MAX Thread Design (2.4 mm diameter) were placed in the upper right first bicuspid, upper right central incisor, upper left central incisor and upper left canine regions. There are several reasons that I prefer this type and size of small-diameter implant for maxillary use. One reason is that the thread pattern is designed for greater engagement with the softer bone in the upper jaw. Additionally, the slightly larger size of the implant allows for greater surface area to integrate with the bone.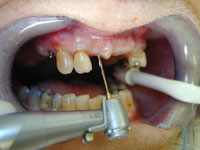
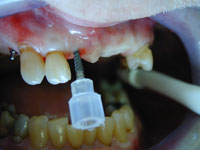
Figure 3. A pilot hole was drilled through the gingiva to penetrate the cortical plate.
Figure 4. The small-diameter implant was inserted and rotated clockwise until resistance was felt.
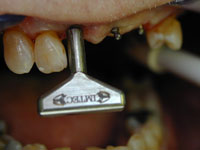
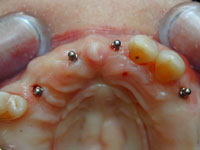
Figure 5. A winged thumb wrench was used to further thread the implant into place.
Figure 6. The 4 maxillary implants in place.
The procedure for placing small-diameter implants in the upper arch is similar to that for the lower. The patient rinsed with a mouthwash containing chlorhexadine (Peridex [3M ESPE]) and local infiltration anesthesia was administered. The locations for each of the 4 implants were marked with an indelible ink pen on the inside of the patient’s new partial denture, which was then briefly seated in the patient’s mouth in order to transfer the ink marks to the gingiva. The implants were placed one at a time by first drilling a pilot hole through the gingiva and penetrating the cortical plate (Figure 3), after which the implant was inserted and rotated clockwise until resistance could be felt (Figure 4). A series of wrenches was then used to further thread the implant into place until the desired level of torque, 35 Ncm, was obtained (Figure 5). In cases such as this one, because upper partial dentures often have less room to accommodate the female housings for the implants, it is helpful to place the prosthetic platform of the MDI slightly deeper than the traditional placement level in the mandible (Figure 6).
To fit the partial denture with the female metal housings for the implants, the ink marks previously made on the denture were used as guides to relieve the area for drilling. The partial denture was hollowed out, until a passive fit was obtained over the implants. The MH-2 metal housings (30% smaller than MH-1 metal housings) were selected and snapped on to the implants (Figure 7). In this case, due to the implants’ prosthetic portion being deeper in the gingiva, it was not necessary to place block-out shims over the implants prior to placement of the metal housings. The metal housings were already flush with the gingiva and there was no risk of acrylic flowing underneath the housings and causing denture lock-on. However, in other cases, block-out shims are often still necessary.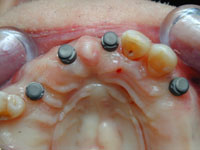
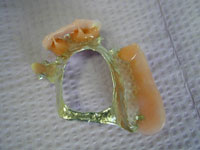
Figure 7. The metal housings were snapped on to the implants.
Figure 8. Pick-up material was placed in the relieved areas of the partial denture.
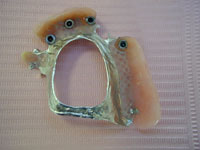
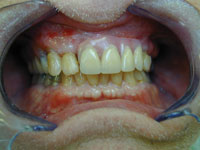
Figure 9. The denture was removed after the metal housings cured in place, then a final polish was performed.
Figure 10. The completed partial was snapped onto the implants.
Adhesive for the pick-up material was applied to the denture in the areas that had been relieved, and SECURE Hard Pick-Up Material (3M ESPE) was placed onto the metal housings and in the relieved areas (Figure 8). The denture was seated in the patient’s mouth, and the patient was instructed to apply normal bite pressure for 7 to 9 minutes while the material set. The denture was then removed and checked for voids, and a final polish was performed (Figure 9). Next, the occlusion was evaluated and adjusted.
Finally, postoperative instructions were given as follows: The patient was instructed to not remove the denture for 24 hours and was informed that some bruising and swelling may occur. He was advised to eat a soft diet for 2 weeks, and an appointment was made for the patient to return the next day for a postoperative checkup.
The following day, the patient was examined for denture sore spots and was shown the path of insertion to remove and insert his new clasp-less partial denture (Figure 10).24/09/2012 at 5:55 pm #15942 drmithila
OfflineRegistered On: 14/05/2011Topics: 242Replies: 579Has thanked: 0 timesBeen thanked: 0 times
drmithila
OfflineRegistered On: 14/05/2011Topics: 242Replies: 579Has thanked: 0 timesBeen thanked: 0 timesSmall-Diameter Implants for Lower Partial Dentures
Small-diameter implants can also be a very useful option for lower partial dentures, as illustrated in Figures 11 to 13. This is a situation that is often encountered in dental offices. As seen, this patient had retained teeth Nos. 27, 28, and 31. Her existing partial denture had clasps placed around these teeth for stabilization. However, there were no teeth on the opposite side for the denture to be anchored to (Kennedy classification 2).
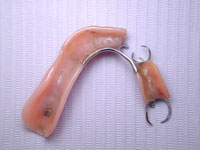
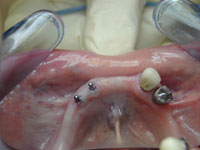
Figure 11. In this case, an existing partial denture used clasps around Teeth Nos. 27, 28, and 31 for retention, but there was no stabilization of the opposite side.
Figure 12. Two small-diameter implants were placed in the positions of Teeth Nos. 21 and 22.
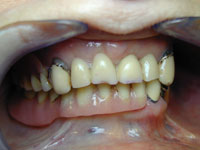
Figure 13. The patient’s partial denture was then adapted to fit the small-diameter implants.
Two small-diameter implants were placed in the positions of Nos. 21 and 22, and the patient’s partial denture was adapted to fit the metal housings. After the treatment was completed in less than an hour, the patient was much more satisfied with the increased retention of her partial denture.
CLOSING COMMENTS
The stability level of a denture can have significant effects on a patient’s quality of life. For example, when loose dentures impede a proper diet, the patient’s systemic health can be negatively impacted. It is vital for dentists to have discussions with edentulous and partially edentulous patients about their current satisfaction level with their existing (partial/full) denture(s). Then, the patient should be presented with any possible options to increase retention and stability to improve their satisfaction level.
For patients who do opt to pursue removable prosthetic implant treatment, small-diameter implants can very often be a more affordable and satisfying solution than some standard-diameter implant treatments. Studies have shown the survival rate of small-diameter implants to ranges from 91.2% to 96.3%, comparable to the success of traditional implants. The added benefits of small-diameter implants—their minimal invasiveness, lower cost, compatibility with areas where there is less bone volume, ability to be immediately loaded, reduced chair time for placement, and overall treatment length—make them a viable treatment option for many patients.24/09/2012 at 5:57 pm #15943Drsumitra
OfflineRegistered On: 06/10/2011Topics: 238Replies: 542Has thanked: 0 timesBeen thanked: 0 timesSmall-Diameter Implant Insurance CodingGaining in rapid popularity are these so-called “mini-implants.” They are sometimes referred to as “small” or “narrow diameter,” depending on the precise dimensions as well as specific manufacturer. The more traditional versions had a simple “ball and socket” female O ring configuration requiring no such separate abutment.
From the coding, billing, and reimbursement perspective, let’s separate the global procedure into its 2 major subcomponents. They are the implant and the existing denture that is now being modified to become an overdenture.The Implant
Procedure code D6010 identifies the surgical placement of the implant body. Of question would be the separate billing and reimbursement for the surgical implant indexes. Procedure code D6190 identifies the fabrication and use of these separate presurgical guides. Most all benefit plans will consider the fabrication and use of such guides as being part of the more global surgical placement of the implant body and will not accept its coding for separate as well as additional reimbursement. In the absence of a definitive narrative report specifying why such an index device is above and beyond the routine delivery of the implants, surgical placement separate reimbursement should not be expected.The Prosthetic
When the techniques involved in the modification of an existing removable denture to one becoming an implant-retained overdenture, they are globally identified with procedure code D5875. A weakness in the existing coding sequence is that code D5875 does not specify if the original removable appliance replaces either a partial or completely edentulous arch. Also the fact that this code, by ADA definition, does not require a “by report” clinical narrative makes claim delay inevitable. That is why I always recommend that the code always be submitted with a description of the prosthetic modification along with the original date of placement and anticipated longevity.
If the final appliances are removable by the patient, they are classified as overdentures—be they complete (D6053) or partial (D6054). Implant supported connecting bars are coded and billed as D6055 while the attachment portion within the overdenture is not separately identified as it is part of the fee for the final appliance.Fee Data
As concerns the codes discussed, remember that the prosthesis modification (D5875) and surgical index (D6190) are only billed and identified once for the series of visits. The surgical placement of the implant (D6010) as well as the prefabricated abutment (D6056) are billed and identified per implant.
In reviewing thousands of claims for multiple implant placements during the same surgical series, it is not uncommon to find documentation and billing based upon the premise of the “single incision rule.” This type of billing generally results in the first implant being billed at 100% of the fee while each additional at the same surgical visit being billed at some variation of 80%, 60%, all the way down to 40% of the fee for the first surgically placed implant.
How you bill in your office is between you, your patients, and their individual benefit plans as long as everyone is billed the same. No variation (Table).Table. Small-diameter Implant code and Fee Data Code Description Low Medium High USA
AverageUSA
RVD5875 Modification of removable prothesis following implant surgery $300 $331 $580 $407 9.69 D6010 Surgical placement if implant body: endosteal implant $1,565 $1,740 $2,190 $1,953 46.50 D6054 Implant/abutment supported removable denture for partially edentulous arch $1,310 $1,520 $2,180 $2,300 47.21 D6056 Prefabricated abutment—uncludes placement $468 $559 $620 $550 13.10 D6190 Radiographical/surgical implant index, by report $199 $300 $400 $293 6.98 These data represent 100% of the 90th percentile. The relative value is based upon the national average and not the individual columns of broad-based data. The abbreviated code numbers and descriptors are not intended to be a comprehensive listing.
-
AuthorPosts
- You must be logged in to reply to this topic.